Laravel-Backpack/PermissionManager is a package that lets you easily manage permissions to your laravel app.
In this tutorial I’ll show you how to use it properly
First of all, you need a Laravel-Backpack installation, with any modules you want.
Instructions here: https://laravel-backpack.readme.io/docs/install-on-laravel-55
Next, install your PermissionManager as shown in the official documentation
https://github.com/Laravel-Backpack/PermissionManager#install
Now, time to make it work.
First, we need to create a PermissionSeeder
In your console:
php artisan make:seeder PermissionSeeder
Add your roles and permissions to PermissionSeeder
Copy this code to your PermissionSeeder
https://gist.github.com/eduardoarandah/e82b207afedd384071e38b1dd909341f
Change your roles and permissions to fit your needs. In this example, dashboard would be allowed to roles: admin, accountant and user
Please note that I’m using the names of all backpack packages in this example
$roles=[
‘admin’,
‘accountant’,
‘user’
];
$permissions=[
‘dashboard’=>[‘admin’,’accountant’,’user’],
‘file-manager’=>[‘admin’],
‘langfile-manager’=>[‘admin’],
‘backup-manager’=>[‘admin’],
‘log-manager’=>[‘admin’],
‘settings’=>[‘admin’],
‘page-manager’=>[‘admin’],
‘permission-manager’=>[‘admin’],
‘menu-crud’=>[‘admin’],
‘news-crud ‘=>[‘admin’],
];
In your database/seeds/DatabaseSeeder.php add a call to PermissionSeeder
$this->call(PermissionSeeder::class);
Add roles to your users
Go to your UsersSeeder file and add roles to your users.
$user1=User::create([‘name’=>’eduardo’,’email’=>’example@gmail.com’,’password’=>bcrypt(‘1234’)]);
$user1->assignRole(‘admin’);
Note: If you don’t have a UsersSeeder file create one with the command
php artisan make:seeder UsersSeeder
And add the call to your database/seeds/DatabaseSeeder.php file
$this->call(UsersTableSeeder::class);
Refresh your database
php artisan migrate:fresh –seed
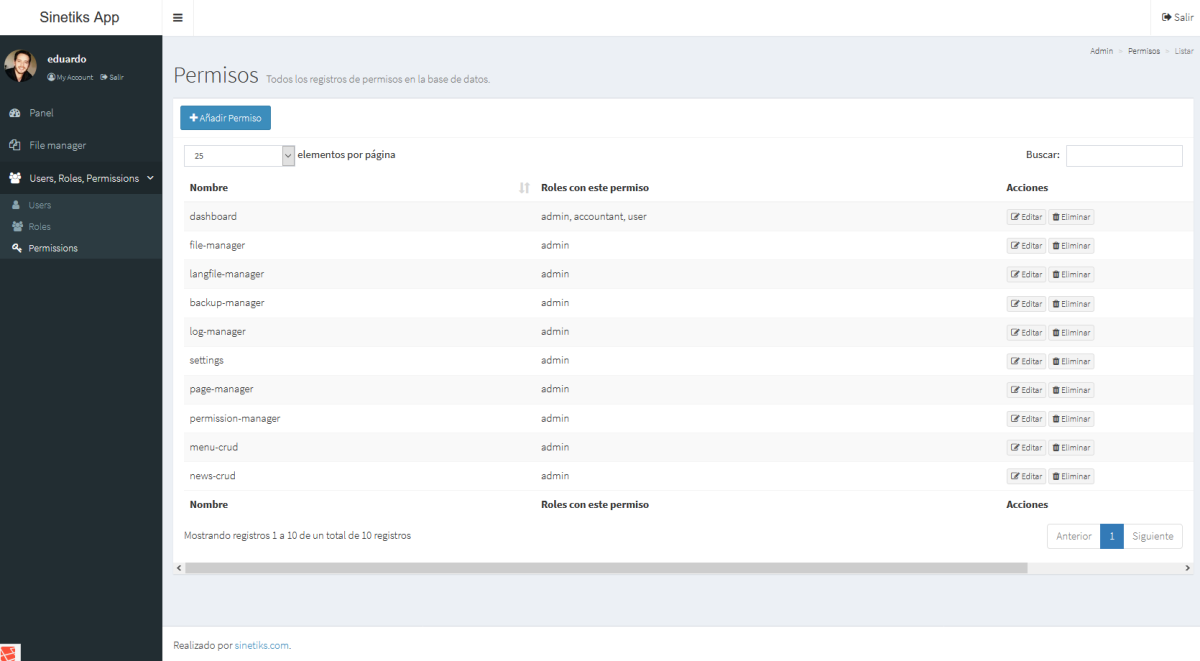
Now your Permission Manager will look like this

Adding restrictions in your routes
1. FileManager
go to config/elfinder.php and add ‘can:file-manager’ to your middleware
‘middleware’ => [‘web’, ‘admin’,’can:file-manager’],
2. Dashboard
Check if you already have the file ‘routes/backpack/base.php’
if not, copy it with this command:
mkdir -p routes/backpack
cp vendor/backpack/base/src/routes/backpack/base.php routes/backpack/base.php
Add a middleware to the dashboard route like this:
Route::get(‘dashboard’, ‘AdminController@dashboard’)->name(‘backpack.dashboard’)->middleware(‘can:dashboard’);
3. PermissionManager
Check if you have the file ‘routes/backpack/permissionmanager.php’
if not, copy it with this command:
mkdir -p routes/backpack
cp vendor/backpack/permissionmanager/src/routes/backpack/permissionmanager.php routes/backpack/permissionmanager.php
Now go to ‘routes/backpack/permissionmanager.php’
and add middleware can:permission-manager like this:
Route::group([
‘namespace’ => ‘Backpack\PermissionManager\app\Http\Controllers’,
‘prefix’ => config(‘backpack.base.route_prefix’, ‘admin’),
‘middleware’ => [‘web’, ‘admin’,‘can:permission-manager’],
], function () {
CRUD::resource(‘permission’, ‘PermissionCrudController’);
CRUD::resource(‘role’, ‘RoleCrudController’);
CRUD::resource(‘user’, ‘UserCrudController’);
});
4. Repeat
This same proccess applies to all your backpack routes, using the matching permission you created.
All you have to do is add can:permission-manager to your route group
How to dynamically show/hide menu items

To show/hide menu items accordingly with permissions, use the @can directive.
Open resources/views/vendor/backpack/base/inc/sidebar.blade.php
and add @can conditions like this
@can(‘dashboard’)
<li><a href=”{{ backpack_url(‘dashboard’) }}”><i class=”fa fa-dashboard”></i> <span>{{ trans(‘backpack::base.dashboard’) }}</span></a></li>
@endcan
@can(‘file-manager’)
<li><a href=”{{ url(config(‘backpack.base.route_prefix’, ‘admin’) . ‘/elfinder’) }}”><i class=”fa fa-files-o”></i> <span>File manager</span></a></li>
@endcan
Note:
if you don’t see the file resources/views/vendor/backpack/base/inc/sidebar.blade.php you may have to publish it with the command:
pa vendor:publish –provider=’Backpack\Base\BaseServiceProvider’
Note2:
My screenshots show a black-and-white backend. If you like that, you may choose font and skin color in file:
/resources/views/vendor/backpack/base/layout.blade.php
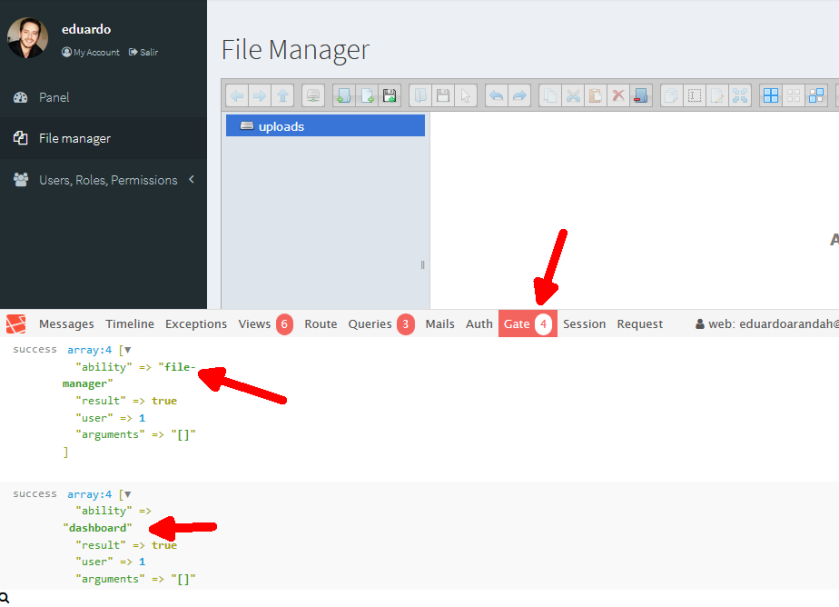
How to debug errors
To find out what permissions are being checked, install laravel-debugbar
https://github.com/barryvdh/laravel-debugbar
Debugbar will show you what is being checked, just click in “gate”
How to add more permissions
In this tutorial I showed you how to restrict access to your backpack modules, but you can use permission manager anywhere in your code
Just follow the examples in the package “laravel-permission”
https://github.com/spatie/laravel-permission
Have a good day!
