Tired of looking for a basic example of a plugin to solve my needs for CRUD operations on a custom table in wordpress I decided to to it myself, and here it is.
This plugin is just a starting point to develop your own management plugin.

This example works with a custom table in the wordpress database. it’s written with simplicity in mind so you can understand everithing quickly.
Includes the following files
- init – plugin initialization, where everything is put toghether
- list – showing a list of items
- update – for updating and deleting items
- create – for inserting new items
- style-admin.css – stylesheet to use in the admin screens
How to use the code
First, install and use the plugin to understand how it works:
- Download the files
- Unzip to wp-content/plugins folder
- Create the table manually on the same wordpress database using the file example-database.sql (you can use the phpmyadmin tool)
- Activate the plugin
You will see a new administration menu on your left:

Take your time and perform all operations: select, insert, update and delete
Customize the code
If yout take a look at the code you’ll see that every function has a prefix “sinetiks” and the name of the table “schools“. This is because you need to create a namespace to avoid duplicated function names.
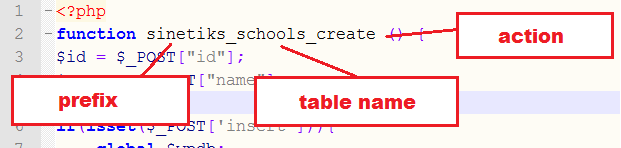
(The name “sinetiks” is the name of my company and “schools” the name of the table to manage)
How to modify the code to manage another table:
- Replace “sinetiks” with your company name and “school” with the table name
- Replace the columns ID and NAME with your columns
- Modify the html forms
To learn how to use the wordpress database functions: http://codex.wordpress.org/Class_Reference/wpdb
The code is written with the minimum to avoid complexity.
Remember that the purpose of this code is to help you build your own plugin with validations, style, proper messages, etc.
Good luck!
If you want to contribute to this example do it in github:
https://github.com/eduardoarandah/wordpress-crud-example

Thanks, I’m lazy and this is what I needed. You could only add CSRF protection ( http://codex.wordpress.org/Function_Reference/wp_nonce_field )
Thank you for the suggestion!
It would be great if you could share with me the changes, so I update the code for everyone benefit!
Hello, I am a young man who is starting in the world of web development, unload the files and paste them in the location you mention but I did not add the new admin menu in the panel
Eduardo: Thanks for taking the time to share your excellent tutorial for the benefit of noobs like myself. Finally, a ray of hope! I haven’t finished going through it yet but one thing I found thus far is that above, you indicate that the “schools” table should be added “on phpmyadmin” DB when, apparently, it ought to be added to the wordpress DB instead. After fixing that, your plugin worked great! Now, to see if I can figure out how it all works… Hey, are you by chance a Texas resident? I ask because the schools appear to be from there. Maybe we’re almost neighbors? 😉
You are right! I meant “phpmyadmin tool”, I’ll fix it.
I live in Mexico and recently developed the website http://cateringforkids.com that works in Houston. I had to develop some plugins myself and had a hard time finding a guide. I hope this one becomes useful to the community.
I think you did a great job on your tutorial and I’m sure it’ll be a big help to a lot of people. Thanks to you, I managed yesterday evening to make some real headway on a CRUD admin function for my wife’s website. I just started learning WordPress development this week and since I now owe you a big favor, you might want to check out Turnkey’s WordPress “appliance” (http://www.turnkeylinux.org/wordpress). It allows you to boot up (from 64-bit hardware only) your own WordPress server (from a liveCD, VM, etc.) and develop/test all you want without worrying about risking damage to your “production” site. I realize that WordPress site developers probably have other, similar choices when testing/developing but this is still a nice tool to have in your toolbox. When you boot into the liveCD, be sure to select the “LiveCD” option in the menu as the default is to prompt you for INSTALLING the appliance to your system (which wouldn’t happen until after you answered a number of prompts)… Booting into the liveCD takes just a couple of minutes. You only have to answer a few prompts and then the server is up and running (you may have to choose to “exit” the dialog at the end although this might not be necessary and I suspect you may want to leave it running). Now, from another computer on your network, just point your browser to the wordpress site on the server and off you go… Cheers Eduardo!
Excellent tutorial.Hope to get more in future.
very nice and appreciable tutorial, if you have time please upload like these more tutorials like membership/login/logout etc, it would be great for biggeners, stay happy… thumps up for you
Nice and simple, good way to start. Thanks for this.
Hi Eduardo,
I am getting below error,
I am having two departments/ plugins, (say soq-marketing and sinetiks-schools;)
and both work fine; But the below problem occurs when both plugins are active
Warning: require_once(C:\wamp\www\internal-system\wp-content\plugins\soq-marketing/schools-list.php)
[function.require-once]:
failed to open stream: No such file or directory in C:\wamp\www\internal-system\wp-content\plugins\sinetiks-schools\init.php on line 57
Call Stack
and then if if comment out following lines
in init.php
of any oh the above plugins, the error goes out and the other plugin works fine, but NOT both at the same time.
//require_once(ROOTDIR . ‘marketing-list.php’);
//require_once(ROOTDIR . ‘marketing-create.php’);
//require_once(ROOTDIR . ‘marketing-update.php’);
//require_once(ROOTDIR . ‘marketing-delete.php’);
Kindly suggest how to deal with such error, and why it is coming…
All I want is have such two plugins working at the same time( yes; all use different database table 🙂
Thanks,
Peer Sajad
Here is my email address peer.sajad@gmail.com
Kindly share yours;
( ! ) Warning: require_once(C:\wamp\www\internal-system\wp-content\plugins\sinetiks-schools/marketing-list.php) [function.require-once]: failed to open stream: No such file or directory in C:\wamp\www\internal-system\wp-content\plugins\soq-marketing\init.php on line 57
When this “/marketing-list.php” file is actually in its own plugin folder, soq-marketing
Please suggest.
Thanks in advance, and sorry for long comments.
Hey I got it working ….
All I did was to define a new constant
define(‘ROOTDIR_MARKETING’, plugin_dir_path(__FILE__));
require_once(ROOTDIR_MARKETING . ‘marketing-list.php’);
require_once(ROOTDIR_MARKETING . ‘marketing-create.php’);
require_once(ROOTDIR_MARKETING . ‘marketing-update.php’);
require_once(ROOTDIR_MARKETING . ‘marketing-delete.php’);
May pagination and jquery validation are now working and no conflict between the plugin directories /files 🙂
-Sorry I bother you Dear.
Great you got it working!
The init file indicates where is each file, each part of the code.
In my case, the folder name is Sinetiks, I guess yours is marketing.
All you have to do is change the path and that’s it.
When you have different entities do the same thing, just add your prefix
For example, two tables customers and offers:
Marketing-Customers-create
Marketing-Customers-update
Marketing-Customers-read
Marketing-Customers-delete
Marketing-Offers-create
Marketing-offers-update
Marketing-offers-read
Marketing-offers-delete
Hello, i feel that i noticed you visited my site thus i got
here to go back the favor?.I’m attempting to to find issues to improve my site!I suppose its ok to use some of your ideas!!
How to display this school list in front End Page? Please guide me…
How to display this school list in client front Page?,,plz give step by step guide
To show it on front page, create a shortcode function like this:
function custom_shortcode() {
return “here goes the code”;
}
add_shortcode( ‘showlist’, ‘custom_shortcode’ );
Then put this on whatever page you like:
[showlist]
i created one php file with the name short code and added the same code to the file and added one page in my front end and updated with [showlist] . When i entered the page it is showing [showlist] in my page not the list
hello your plugin is awesome…i use it..but and i try it my self i remove id . instead of name i put answer and here i add a button add ans . so onclick and ans new text filed is created..so how to save this value in othrer table.and add ans is more than one . and the new table have two field id and all the answer .so how can i do it….reply me asap
Sorry, I don’t understand your english.
The code I wrote is very simple so people can use it with minimum php+mysql knowledge.
I would suggest that you keep things simple, as wordpress is not ideal for developing complex systems.
plz send me your email id i will send you screen shot
Put screenshot here. Or tweet it and copy the url
i want to add student name in other table so how can i do that ?
Just repeat functions and change the names
ok….i done all my requirements….next is how to show this form in frontend in ceratin template file in wordpress …
Hi,
I have created table directly from phpmyadmin, I am sending data from
front end form. Could anyone suggest here what is the best way to handle data from backend ?
Of course I want to edit and delete records from the same table.
Thanks in advance
this example code is exactly what it does: it creates, updates, lists and deletes records.
All you have to do is repeat the steps for every table
i have a simple form with different field so how can i save this this form fields value in databse
explain me step by step …..how to create action ,make function …etc..etc….and in which file …my form is in template file……ans me asap
hy..
my question..
how make pagination in list your plugin..
thanks
Hi,
Thankyou very much for this nice tutorial.. This is what i had been searching for a whole week with much pain..
Very nice and thankyou once again..
fantastic for beginners…
Hi, i just modified your plugin with additional columns with the table, say 7 in total now. It works fine except that it is not updating the table after editing…. Could you please guide?
let me paste the update code here(cities-update.php):
update(
‘cities’, //table
array(‘city_code’ => $code), //data
array(‘city_name’ => $name), //data
array(‘city_grade’ => $grade), //data
array(‘city_status’ => $status), //data
array(‘city_state’ => $state), //data
array(‘city_country’ => $country), //data
array(‘city_id’ => $id ), //where
array(‘%s’), //data format
array(‘%s’), //data format
array(‘%s’), //data format
array(‘%s’), //data format
array(‘%s’), //data format
array(‘%s’), //data format
array(‘%d’) //where format
);
}
//delete one row from the table
else if(isset($_POST[‘delete’])){
$wpdb->query($wpdb->prepare(“DELETE FROM cities WHERE city_id = %d”,$id));
}
else{//selecting value to update
$city = $wpdb->get_results($wpdb->prepare(“SELECT city_id,city_code,city_name,city_grade,city_status,city_state,city_country from cities where city_id=%d”,$id));
foreach ($city as $c ){
$code=$c->city_code;
$name=$c->city_name;
$grade=$c->city_grade;
$status=$c->city_status;
$state=$c->city_state;
$country=$c->city_country;
}
}
?>
<link type="text/css" href="/World-Cities/style-admin.css” rel=”stylesheet” />
City you edit now
City deleted
<a href="”>« Back to cities list
City updated
<a href="”>« Back to cities list
<form method="post" action="”>
Code<input type="text" name="code" value="”/>
Name<input type="text" name="name" value="”/>
Grade<input type="text" name="grade" value="”/>
Status<input type="text" name="status" value="”/>
State<input type="text" name="state" value="”/>
Country<input type="text" name="country" value="”/>
<?php
}
I suggest that you enable debug mode on wordpress http://codex.wordpress.org/WP_DEBUG
in wp-config.
Also, enable show errors and warnings in PHP like this http://stackoverflow.com/questions/5438060/showing-all-errors-and-warnings
this way you will find the error yourself.
Thanks ed…. 🙂
how could i add this into my website
how to insert dlete update image in database wordpress plz help
Hey very good tutorial.I am new to wordpress but it gives me good help
I have create a plugin for my requirement based on this idea.
and here is the link of my plugin update file http://pastebin.com/FmwnFX5a
Actually I have set a front-end user registration system in my project i.e. front-end user can register their self and also logged in to the site. but the registration is based on the activation of the users. means when a new user register their self then by default his status is not-active, once admin approve his account then he can login to the site.
Now using this idea I have created a plugin in which I am displaying that users record, updating and deleting.
but I want that when User registration is approved then at that time a confirmation email should be send to his email(through which he is registered).
So how can I do this.
I have commented my idea in the attached link file, please check that and if possible then give me any solution to that.
Thanks
I would do this:
1) let the user register
2) You create a HOOK that triggers when a user is registered
http://codex.wordpress.org/Plugin_API/Action_Reference/user_register
that Hook sets a custom role like “pending” (with no capabilities)
http://stackoverflow.com/questions/12985692/how-to-create-custom-user-role-in-wordpress
(that way you have the user registered but he can’t do anything on the system)
3) system sends an email saying “your suscription is to be approved”
4) you create a screen where admin “approves” the user. When approving a user, you set another role, that depends on what permissions you want for those approved users, example “author”
5) system sends an email “your suscription is approved, login with your password here__ if you forgot your password click here ____”
you do that with function wp_mail
(take care of not sending too many emails at once)
thanks dear for your reply. I have created a plugin. I’m sharing its code with you using pastebin. Kindly check it and tell me that where I am doing mistake. because when I activate my plugin then as it shows the result of the users, update and delete successfully. but due to its activation the other theme is broken up. and when I upload this theme to online server then it give me very bad result. As my site is in Parsian language. so on online server when I activate this plugin then the parsian language labels and text are changed to some kind of symbols.
here is my code.
init.php file http://pastebin.com/nytfQvFn
for deletion function, http://pastebin.com/0V98qfMP
for list function, http://pastebin.com/CEEguFXq
for update function, http://pastebin.com/35YvET8P
for view function, http://pastebin.com/WHLfQrXn
kindly have a look on this code. and then tell me that where I am doing mistake.
One more thing that I am new to wordpress, so kindly explain that to me as well if possible.
Thanks.
I suggest that you check function names so there’s no repetition on the names.
Then save all your code in UTF-8 format, you can use notepad++ for that. Strange symbols appear when encoding is incorrect.
When uploading via FTP make shure that encoding is not modified.
thanks for your reply.
Is there any other error in the code except function names ?
and please tell me that how can I save all my code in UTF-8 format ?
Thanks
I don’t have time to debug your code, sorry man.
To save in UTF8 in notepad++ https://www.youtube.com/watch?v=Ynu6G1YysPs
Nice tutorial!
Thank you for simple tutorial (y)
Greetings from Greece Eduardo.
Thank you so much for taking the time to write this plugin an share it with us. I’m greatful for this. This is exactly what i was looking for all week.
It helped me clear up a lot of things about WP plugins. How to write one and how to move around the pages. You see, even though i have experience in php, i’m new to plugin developing for WP.
Thanks again man.
Thanks for this Post and Code it’s working fine
Hello, I want to just display ‘create’ file on the page, that users can add new school into my database, but I really don’t know where to place this shortcode. Into which file and where exactly. I am trying to play with it, but still it doesn’t work, no matter where do I place it and no matter between which code. Could you help me?
This is what you wrote in one of comments:
function custom_shortcode() {
return “here goes the code”;
}
add_shortcode( ‘showlist’, ‘custom_shortcode’ );
And “here goes the code”, I am trying to put the main code from int.php or from create.php or from school-list.php, after “return” and nothing is working.
Anyway, thanks so much for this source of code, I hope that after getting done with shortcode, I will be able to develop the table which I need for my school project. Thanks a lot!
you should learn about wordpress shortcodes before using this code. You can start here: https://codex.wordpress.org/Shortcode_API
Thank you for advice. Unfortunately, still I didn’t solve it, but I am trying. Thanks for tutorial, cheers.
How can i update and delete record..
I done it. thanks a lot
thanks a lot for such a great example
Thanks so much
Thanks for the example.
I am trying to implement it. I changed what you suggested above. The plug in will install but when I activate it I get the following error.
Parse error: syntax error, unexpected T_IF in E:\……\plugins\Current Events\event-create.php on line 7
Here is my code for the event-create.php. If you wouldn’t mind having a look I would greatly appreciate it.
insert( ‘wp_events’, array( ‘event_date’ => $_POST[‘eventdate’], ‘event_name’ => $_POST[‘eventname’], ‘event_location’ => $_POST[‘eventlocation’]), array( ‘%s’, ‘%s’, ‘%s’ ) );
}
$message.=”Event Added”;
}
?>
<link type="text/css" href="/Current_Events/style-admin.css” rel=”stylesheet” />
Add New Event
<form method="post" action="”>
Enter ID’s
Event Date<input type="text" name="eventdate" value="”/>
Event Name<input type="text" name="eventname" value="”/>
Event Location<input type="text" name="eventlocation" value="”/>
<?php
}
Thanks
Roland
Thanks You!
Good afternoon, the link is broken, Mr. Eduardo could create another, please? Thank you.
Thanks for the notice!
I just uploaded the code to github for anyone to help improving it.
Also updated the download link
Thanks a lot for the help.
how to show the add students form in frontent user without admin login?
You are awesome, thank you thank you and thank you! You just saved me countless hours of coding and research and I *so* appreciate it.
It’s great thanks lot Where i place the shortcode php file
Thanks for the post – very useful.
For info, the plugin wouldn’t install for me first time round.
To make it install successfully, I had to move the ‘init.php’ file outside of the folder to the same location as the readme file.
Hope this is useful information for somebody.
I programmed it long ago, surely it needs some updates. If you want to contribute, make me a PR in github https://github.com/eduardoarandah/wordpress-crud-example
Hi Eduardo,
Could you please share your email, I need to discuss about the plugin.
Thanks
Is it about improving it? send the request via https://github.com/eduardoarandah/wordpress-crud-example
I coded some years ago, I’m sure it needs updating.
my email eduardo@sinetiks.com
u r great person for supporting..
how to other filled add in form and update gender,mutiplie checkbox , mutiple image and image upload in upload folder…
please inform to me this is my email id is vijay.pancholi2626@gmail.com
Hi Eduardo,
Your tutorial was just what I needed. Thanks! it worked great as a plugin accessed from backend of WordPress. However, can you direct me to how I can use the plugin on a front end page? My target is to bring the CRUD functions to front end. To start of showing the list, I tried using a custom shortcode by returning $rows from the list.php, but the page just displayed “Array”. Could you point me in the direction to put this plugin on the front end? Thanks
It help me lot and save my time. I was tired of searching things on net. I know php programming but don’t know how to integrate custom code or plugin with wordpress. Really it helps me lot. I am new to development and was teaching in colleges since 12+ years. thanks again.
Really very helpful so thanks of you for share this code. I was searching for the same code. Thank you
Nice post! You can also try this plugin https://wordpress.org/plugins/luckywp-table-of-contents/
Nice post! You can also try this plugin https://theluckywp.com/product/table-of-contents/
Thank you so much! Is very useful guide.
Now I wonder how can I add pagination to the Database results.
Any help is highly appreciated.
Thanks again 🙂
How to Use Insert Code in Frontend ?